termscp

termscp is a feature-rich terminal file transfer client and explorer with a TUI (Terminal User Interface). It lets you connect to a remote server to upload and download files while interacting with your local file system at the same time. termscp runs on Linux, macOS, FreeBSD, NetBSD, and Windows.
Features
- Multiple transfer protocols: SFTP, SCP, FTP and FTPS, Kube, S3, SMB, and WebDAV.
- Dual-pane explorer to browse and operate on both the remote and the local file system: create, remove, rename, search, view, and edit files.
- Bookmarks and recent connections to quickly reconnect to your favorite hosts.
- View and edit files with your favorite editor.
- SFTP/SCP authentication with SSH keys or username and password.
- Embedded terminal for running commands on your system.
- Make it yours: themes, custom file explorer format, customizable text editor, and customizable file sorting.
- Desktop notifications when a large file has been transferred.
- File watcher that keeps your changes synchronized with the remote host.
- Save your passwords in your operating system’s key vault.
- Rust-powered and built with an eye on performance.
Ready to try it? See Installation.
Installation
termscp is available for many platforms. Pick the method that matches your system below.
Linux, FreeBSD, and macOS
This shell script installs termscp on your system with a single command:
curl --proto '=https' --tlsv1.2 -sSLf https://termscp.rs/install.sh | sh
On macOS the installation requires Homebrew; otherwise the Rust compiler is installed to build termscp from source.
Windows
Install termscp from PowerShell with a single command:
irm https://termscp.rs/install.ps1 | iex
Alternatively, install it with Chocolatey:
choco install termscp
NetBSD
Install termscp from the official repositories:
pkgin install termscp
Arch Linux
Install termscp from the official repositories:
pacman -S termscp
Requirements
The following system dependencies are required to run termscp.
- Linux users:
- libdbus-1
- pkg-config
- libsmbclient
- FreeBSD and NetBSD users:
- dbus
- pkgconf
- libsmbclient
Optional requirements
These dependencies are not required to run termscp, but they are needed to enjoy all of its features.
- Linux and FreeBSD users, to open files via
V(at least one of these):- xdg-open
- gio
- gnome-open
- kde-open
- Linux users: a keyring manager. Read more in the Password security page.
- WSL users, to open files via
V:
Updating termscp
To update termscp to the latest version, run it from the command line with:
(sudo) termscp update
For all platforms and methods, see https://termscp.rs/install.
Connecting to a server
termscp can start in three different ways depending on the arguments you pass.
- No arguments: termscp opens the authentication form, where you provide the parameters required to connect to the remote host.
- An address argument: termscp skips the authentication form and connects directly to the remote host.
- A bookmark name with
-b <bookmark-name>: termscp resolves the argument as a saved bookmark and connects. Repeat-bto open several bookmarks.
When you provide an address argument or a bookmark name, you can also provide a start working directory for the local host.
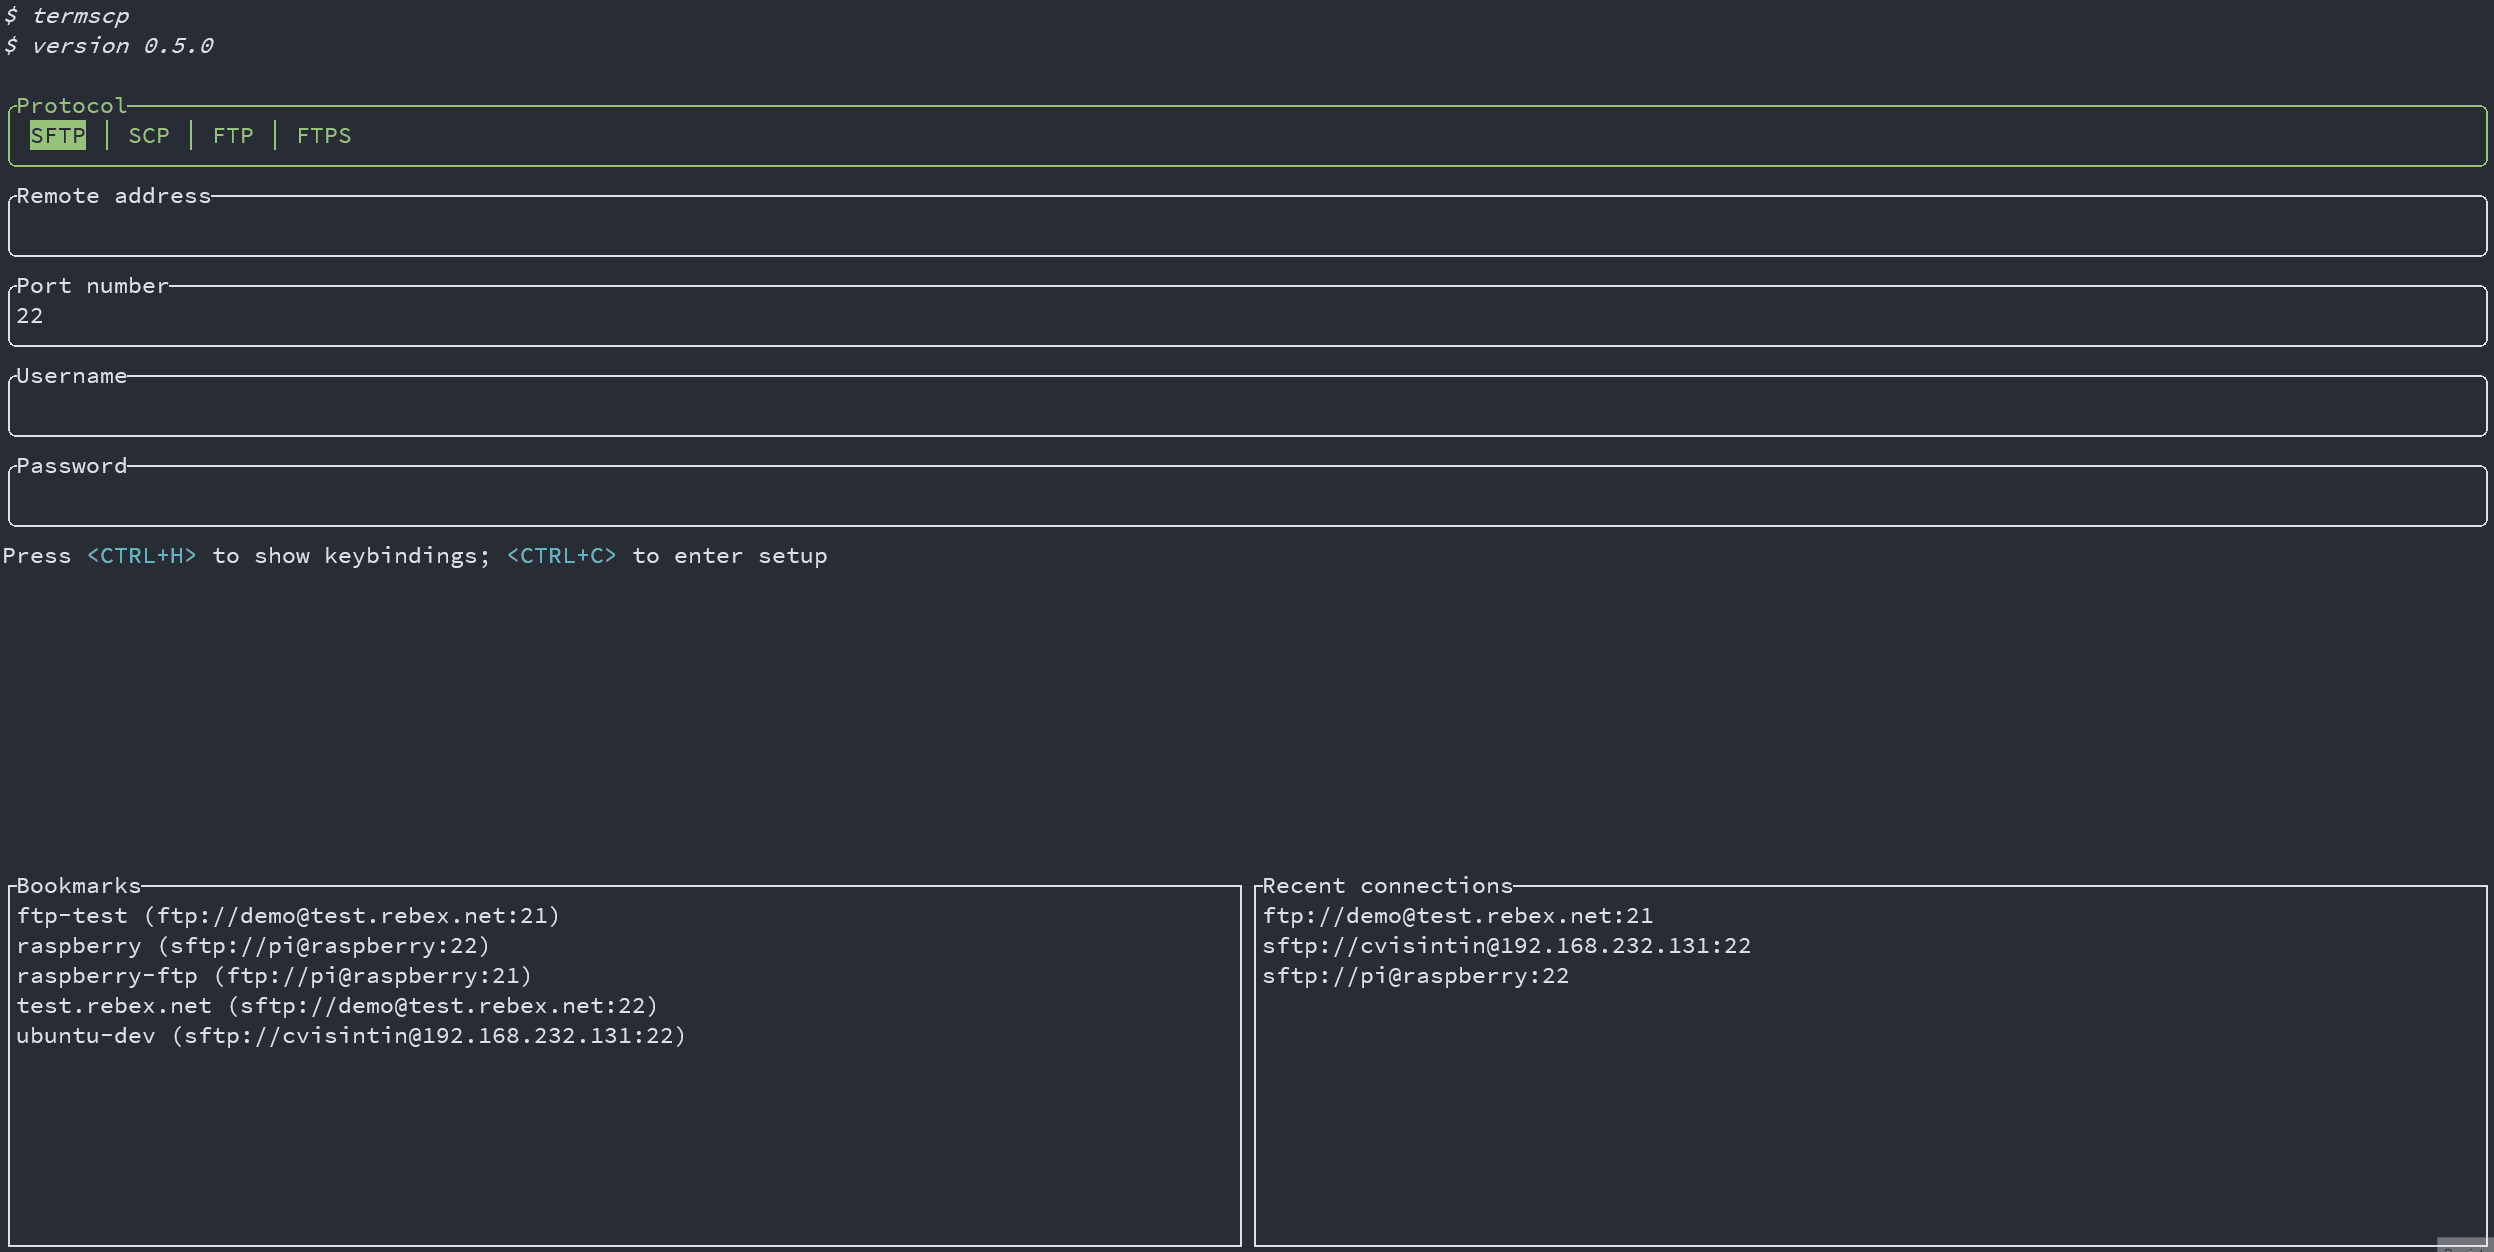
The authentication form
When termscp starts without an address, it shows the authentication form. Fill in the protocol, address, port, username, and password, then connect. termscp will open the dual-pane explorer once the connection succeeds.
Address argument syntax
The generic address argument has the following syntax:
[protocol://][username@]<address>[:port][:wrkdir]
This syntax is convenient, and you will probably use it instead of the interactive form. Here are some examples.
Connect using the default protocol (defined in your configuration) to
192.168.1.31. If the port is not provided, the default port for the selected
protocol is used. The username is the current user’s name.
termscp 192.168.1.31
Connect using the default protocol to 192.168.1.31 as user root:
termscp root@192.168.1.31
Connect using SCP to 192.168.1.31 on port 4022 as user omar:
termscp scp://omar@192.168.1.31:4022
Connect using SCP to 192.168.1.31 on port 4022 as user omar, starting in
directory /tmp:
termscp scp://omar@192.168.1.31:4022:/tmp
For protocol-specific address syntax (S3, Kube, WebDAV, and SMB), see Connection parameters.
How the password is provided
When you provide the address as an argument, there is no field for the password in the address itself. You can provide the password in three ways:
-
You will be prompted for it. This is the default: if you don’t use any of the methods below, termscp prompts for the password, like classic tools such as
scpandssh. -
-P, --passwordoption: pass the password directly on the command line. This method is discouraged because it is insecure: the password may be kept in your shell history. -
Via
sshpass: provide the password throughsshpass, for example:sshpass -f ~/.ssh/topsecret.key termscp cvisintin@192.168.1.31
Connection parameters
Each protocol has its own set of authentication-form fields and its own command-line address syntax. This page describes them protocol by protocol.
SFTP / SCP
Authentication-form fields:
- Host (address)
- Port (default
22) - Username
- Password or SSH key
You can authenticate either with a username and password or with an SSH key. See SSH key storage for how to manage keys.
Address syntax:
[protocol://][username@]<address>[:port][:wrkdir]
FTP / FTPS
Authentication-form fields:
- Host (address)
- Port (default
21) - Username
- Password
- Secure (FTPS): enable TLS to use FTPS instead of plain FTP
Address syntax:
[protocol://][username@]<address>[:port][:wrkdir]
Kube
Authentication-form fields:
- Namespace
- Cluster URL (Kubernetes API URL)
- Username
- Client certificate path
- Client key path
Address syntax:
kube://[namespace][@<cluster_url>][$</path>]
S3
termscp supports both AWS S3 and other S3-compatible endpoints.
Authentication-form fields:
- Bucket name
- Region (for AWS S3) or endpoint (for other S3-compatible servers)
- Profile
- Access key
- Secret access key
- Security token
- Session token
- New path style
The required and optional fields differ depending on the endpoint:
- AWS S3:
- bucket name (required)
- region (required)
- profile (optional; defaults to
default) - access key (required unless the bucket is public)
- secret access key (required unless the bucket is public)
- security token (if required)
- session token (if required)
- new path style: NO
- Other S3 endpoints:
- bucket name (required)
- endpoint (required)
- access key (required unless the bucket is public)
- secret access key (required unless the bucket is public)
- new path style: YES
Address syntax:
s3://<bucket>@<region>[:profile][:/wrkdir]
For example:
s3://buckethead@eu-central-1:default:/assets
S3 credentials
To connect to an AWS S3 bucket you must provide credentials. There are three ways to do this.
-
Authentication form: provide the access key (usually mandatory), the secret access key (usually mandatory), the security token, and the session token. If you save the S3 connection as a bookmark, the access key and secret access key are saved as an encrypted AES-256/BASE64 string in your bookmarks file. The security token and session token are not saved, since they are meant to be temporary credentials.
-
Credentials file: configure the AWS CLI with
aws configure. Your credentials are then stored at~/.aws/credentials. If you use a profile other thandefault, provide it in the profile field of the authentication form. -
Environment variables: provide your credentials as environment variables. These always override the credentials in the credentials file. The following are usually mandatory:
AWS_ACCESS_KEY_ID: AWS access key ID (usually starts withAKIA...)AWS_SECRET_ACCESS_KEY: the secret access key
If you have configured stronger security, you may also need:
AWS_SECURITY_TOKEN: security tokenAWS_SESSION_TOKEN: session token
Your credentials are safe: termscp does not manipulate these values directly.
They are consumed directly by the s3 crate.
SMB
Authentication-form fields:
- Server (address)
- Share
- Username
- Password
- Port (other systems only; default
445) - Workgroup (other systems only)
On Windows the port and workgroup fields are not used.
Windows address syntax:
\\[username@]<server-name>\<share>[\path\...]
Other systems address syntax:
smb://[username@]<server-name>[:port]/<share>[/path/.../]
WebDAV
Authentication-form fields:
- URI (the base WebDAV endpoint)
- Username
- Password
Address syntax:
http(s)://<username>:<password>@<url></path>
The file explorer
After you establish a connection with a remote host, termscp shows the file explorer. The explorer is made up of three panels.
- Local explorer panel: displayed on the left of the screen. It shows the entries of the current directory on localhost.
- Remote explorer panel: displayed on the right of the screen. It shows the entries of the current directory on the remote host.
- Find results panel: shown after you search for files. Depending on where you searched (local or remote), it replaces the local explorer panel or the remote explorer panel and lists the entries matching your search query.
Switching between panels
Use the following keys to move between panels.
<LEFT>: move to the local explorer panel.<RIGHT>: move to the remote explorer panel.<TAB>: switch the active explorer tab.<ESC>: while in the find results panel, exit it and return to the previous panel.
For the complete list of keys available in the explorer, see Keyboard shortcuts.
Keyboard shortcuts
The following keys are available in the file explorer. Press <H|F1> at any time to open the in-app help.
| Key | Action |
|---|---|
<ESC> | Disconnect from the remote and return to the authentication page |
<BACKSPACE> | Go to the previous directory in the navigation stack |
<TAB> | Switch the active explorer tab |
<RIGHT> | Move to the remote explorer tab |
<LEFT> | Move to the local explorer tab |
<UP> | Move up in the selected list |
<DOWN> | Move down in the selected list |
<PGUP> | Move up in the selected list by 8 rows |
<PGDOWN> | Move down in the selected list by 8 rows |
<ENTER> | Enter the selected directory |
<SPACE> | Upload or download the selected file |
<BACKTAB> | Switch between the log tab and the explorer |
<A> | Toggle the display of hidden files |
<B> | Choose how files are sorted |
<C|F5> | Copy the selected file or directory |
<D|F7> | Make a new directory |
<E|F8|DEL> | Delete the selected file |
<F> | Search for files (wildcard matching is supported) |
<G> | Go to the supplied path |
<H|F1> | Show the help |
<I> | Show information about the selected file or directory |
<K> | Create a symlink pointing to the currently selected entry |
<L> | Reload the current directory’s content, or clear the current selection |
<M> | Select a file |
<N> | Create a new file with the provided name |
<O|F4> | Edit the selected file in your text editor |
<P> | Open the log panel |
<Q|F10> | Quit termscp |
<R|F6> | Rename the selected file |
<S|F2> | Save the selected file as a new name |
<T> | Synchronize changes on the selected path to the remote |
<U> | Go to the parent directory |
<V|F3> | Open the selected file with the default program for its file type |
<W> | Open the selected file with a program you specify |
<X> | Execute a command |
<Y> | Toggle synchronized browsing |
<Z> | Change the file mode |
</> | Filter files (both regex and wildcard matching are supported) |
<CTRL+A> | Select all files |
<ALT+A> | Deselect all files |
<CTRL+C> | Abort the file transfer process |
<CTRL+S> | Get the total size of the selected path |
<CTRL+T> | Show all synchronized paths |
Working with multiple files
termscp lets you act on several files at once. Use these controls to build a selection.
<M>: mark the highlighted file for selection.<CTRL+A>: select all files in the current directory.<ALT+A>: deselect all files.
Once a file is marked for selection, it is displayed with a highlighted background.
When a selection exists, only the selected files are processed for actions; the currently highlighted item is ignored. You can also work on multiple files while in the find results panel.
Actions on a selection
All actions are available when working with multiple files, but some behave slightly differently. With a selection, the name you enter refers to the destination directory rather than a single destination file.
- Copy: you are prompted for a destination. With multiple files selected, this name is the destination directory where all the files are copied.
- Rename: same as copy, but the files are moved to the destination directory.
- Save as: same as copy, but the files are written to the destination directory.
The transfer queue
If you select a file in a directory (for example /home) and then change directory, the file stays selected and is shown in the transfer queue in the bottom panel.
When a file is selected, the remote directory active at that moment is associated with its entry. If the file is later transferred, it is transferred to the remote directory associated with it.
Example
Suppose you select the local file /home/a.txt while the remote panel is at /tmp, then you move to /var, select /var/b.txt while the remote panel is at /home, and finally perform a transfer. The result is:
/home/a.txtis transferred to/tmp/a.txt/var/b.txtis transferred to/home/b.txt
Synchronized browsing
Synchronized browsing keeps navigation in sync between the two explorer panels. While it is enabled, whenever you change the working directory in one panel, the same change is reproduced in the other panel.
To enable synchronized browsing, press <Y>. Press <Y> again to disable it. While it is enabled, the status bar reports the synchronized browsing state as ON.
Opening and editing files
termscp can open files with an external application and edit text files in your configured editor. Both local and remote files are supported.
Open and Open With
Press <V> to open a file with the system default application for its file type. termscp relies on your operating system’s default opener (powered by the open crate), so make sure at least one of the following is available on your system.
- Windows: handled automatically through the
startcommand. - macOS: handled automatically through
open, which is already installed. - Linux: one of
xdg-open,gio,gnome-open, orkde-openmust be installed. - WSL:
wslviewis required. Install wslu.
Press <W> to open a file with a program you specify.
Editing text files
Press <O> to open a file in your configured text editor. Only text files are supported; binary files are not.
If the file is located on the remote host, it is first downloaded into your temporary file directory, and then re-uploaded to the remote host only if you changed it. termscp detects changes by checking the file’s last modification time.
Editing remote files
You cannot edit a remote file in place directly from the remote panel. When you open a remote file, it is downloaded into a temporary directory, but termscp cannot create a watcher to detect when the external program you used to open it has closed, so it cannot tell when you are done editing. To edit a remote file, download it to a local directory first, edit it there, and then upload it again.
Bookmarks and recent hosts
termscp lets you save your favourite hosts as bookmarks, which can then be loaded quickly from the main layout. termscp also keeps the last 16 hosts you connected to. Both features let you reload all the parameters required to connect to a remote simply by selecting an entry in the tab under the authentication form.
Where bookmarks are stored
Bookmarks are saved, when possible, in the configuration directory:
$HOME/.config/termscp/on Linux/BSD$HOME/.config/termscp/on macOS%USERPROFILE%\.termscp\on Windows
Saving passwords
For bookmarks only, you can optionally save the password used to authenticate. This does not apply to recent hosts, which never save passwords. The password is not saved by default; you are prompted to choose whether to save it when you create a new bookmark.
If you are concerned about the security of the passwords saved for your bookmarks, see Are my passwords safe?
Creating a bookmark
- Fill in the authentication form with the parameters to connect to your remote server.
- Press
<CTRL+S>. - Type the name you want to give to the bookmark.
- Choose whether to remember the password.
- Press
<ENTER>to submit.
Loading a bookmark
To use a previously saved connection, press <TAB> to navigate to the bookmarks list, then press <ENTER> to load the bookmark parameters into the form.
Keeping files in sync
The file watcher synchronizes local paths to a remote path. When a change is detected on a watched local path, it is propagated to the configured remote path within about 5 seconds.
You can watch as many paths as you like.
Watching a path
- Put the cursor on the local explorer, on the file or directory you want to keep synchronized.
- In the remote panel, navigate to the directory where the changes should be reported.
- Press
<T>. - Answer
<YES>to the popup.
Unwatching a path
You can stop watching a path in two ways:
- Press
<T>on the watched local path (or any of its subfolders). - Press
<CTRL+T>, then press<ENTER>on the path you want to unwatch.
Propagated changes
The following changes are reported to the remote host:
- New files and file changes
- Files moved or renamed
- Files removed or unlinked
The watcher works in one direction only (local to remote). Changes made on the remote host are not synchronized back to the local host.
Configuration
termscp supports a number of user-defined parameters. termscp stores them in a TOML file and a few directories, but you never edit these files by hand: configuration is done entirely from the user interface.
To enter the configuration, press <CTRL+C> from the termscp home.
termscp requires these paths to be accessible:
$HOME/.config/termscp/on Linux/BSD$HOME/.config/termscp/on macOS%USERPROFILE%\.termscp\on Windows
Parameters
The following parameters can be configured:
- Text Editor: the text editor to use. By default termscp finds the default
editor for you; with this option you can force an editor to be used (e.g.
vim). GUI editors are also supported, unless they detach (nohup) from the parent process. - Default Protocol: the default value for the file transfer protocol to be used in termscp. It applies to the login page and to the address CLI argument.
- Show Hidden Files: whether hidden files are displayed by default. You can
also toggle hidden files at runtime by pressing
A. - Check for updates: if set to
yes, termscp queries the GitHub API to check whether a new version of termscp is available. - Prompt when replacing existing files: if set to
yes, termscp prompts for confirmation whenever a file transfer would replace an existing file on the target host. - Group Dirs: whether directories are grouped in the file explorers. If
Display firstis selected, directories are sorted with the configured method but displayed before files; withDisplay lastthey are displayed after files. - Remote file formatter syntax: syntax used to display file info for each file in the remote explorer. See File explorer format.
- Local file formatter syntax: syntax used to display file info for each file in the local explorer. See File explorer format.
- Enable notifications: if set to
Yes, desktop notifications are displayed. See Notifications. - Notifications: minimum transfer size: if the transfer size is greater than
or equal to the specified value, transfer notifications are displayed. The
accepted format is
{UNSIGNED} B/KB/MB/GB/TB/PB. - SSH configuration path: SSH configuration file to use when connecting to a
SCP/SFTP server. If left empty, no file is used. You can specify a path
starting with
~to indicate the home directory (e.g.~/.ssh/config). The attributes supported by termscp are listed at the ssh2-config exposed attributes. See also SSH key storage.
File explorer format
You can define a custom format for the file explorer through the configuration. This is possible for both the local and the remote host, so you can use two different syntaxes. The fields are named File formatter syntax (local) and File formatter syntax (remote), and they define how the file entries are displayed in the file explorer.
Syntax
The syntax for the formatter is the following:
{KEY1}... {KEY2:LENGTH}... {KEY3:LENGTH:EXTRA} {KEYn}...
Each key in braces is replaced with the related attribute, while everything outside braces is left unchanged.
- The key name is mandatory and must be one of the keys below.
LENGTHdescribes the width reserved to display the field. Static attributes do not support it (GROUP,PEX,SIZE,USER).EXTRAis supported only by some keys and provides an additional option. See the keys below to check whetherEXTRAis supported.
Keys
These are the keys supported by the formatter:
| Key | Description |
|---|---|
ATIME | Last access time (default %b %d %Y %H:%M); EXTRA is the time format (e.g. {ATIME:8:%H:%M}) |
CTIME | Creation time (default %b %d %Y %H:%M); EXTRA is the time format (e.g. {CTIME:8:%H:%M}) |
GROUP | Owner group |
MTIME | Last change time (default %b %d %Y %H:%M); EXTRA is the time format (e.g. {MTIME:8:%H:%M}) |
NAME | File name (folders between root and first ancestors are elided if longer than LENGTH) |
PATH | File absolute path (folders between root and first ancestors are elided if longer than LENGTH) |
PEX | File permissions (UNIX format) |
SIZE | File size (omitted for directories) |
SYMLINK | Symlink target (if any, -> {FILE_PATH}) |
USER | Owner user |
Default format
If left empty, the default formatter syntax is used:
{NAME:24} {PEX} {USER} {SIZE} {MTIME:17:%b %d %Y %H:%M}
SSH key storage
Along with configuration, termscp provides an essential feature for SFTP/SCP clients: the SSH key storage.
To access the SSH key storage, enter the configuration and move to the
SSH Keys tab.
Manage keys
From the SSH Keys tab you can:
- Add a new key: press
<CTRL+N>. You are prompted to provide the hostname/IP address and the username associated with the key, then a text editor opens: paste the private SSH key into the editor, save and quit. - Remove an existing key: press
<DEL>or<CTRL+E>on the key you want to remove to delete it persistently from termscp. - Edit an existing key: press
<ENTER>on the key you want to edit to change the private key.
Password-protected keys
Password-protected private keys are supported. The password you provide for authentication in termscp is valid both for username/password authentication and for key authentication.
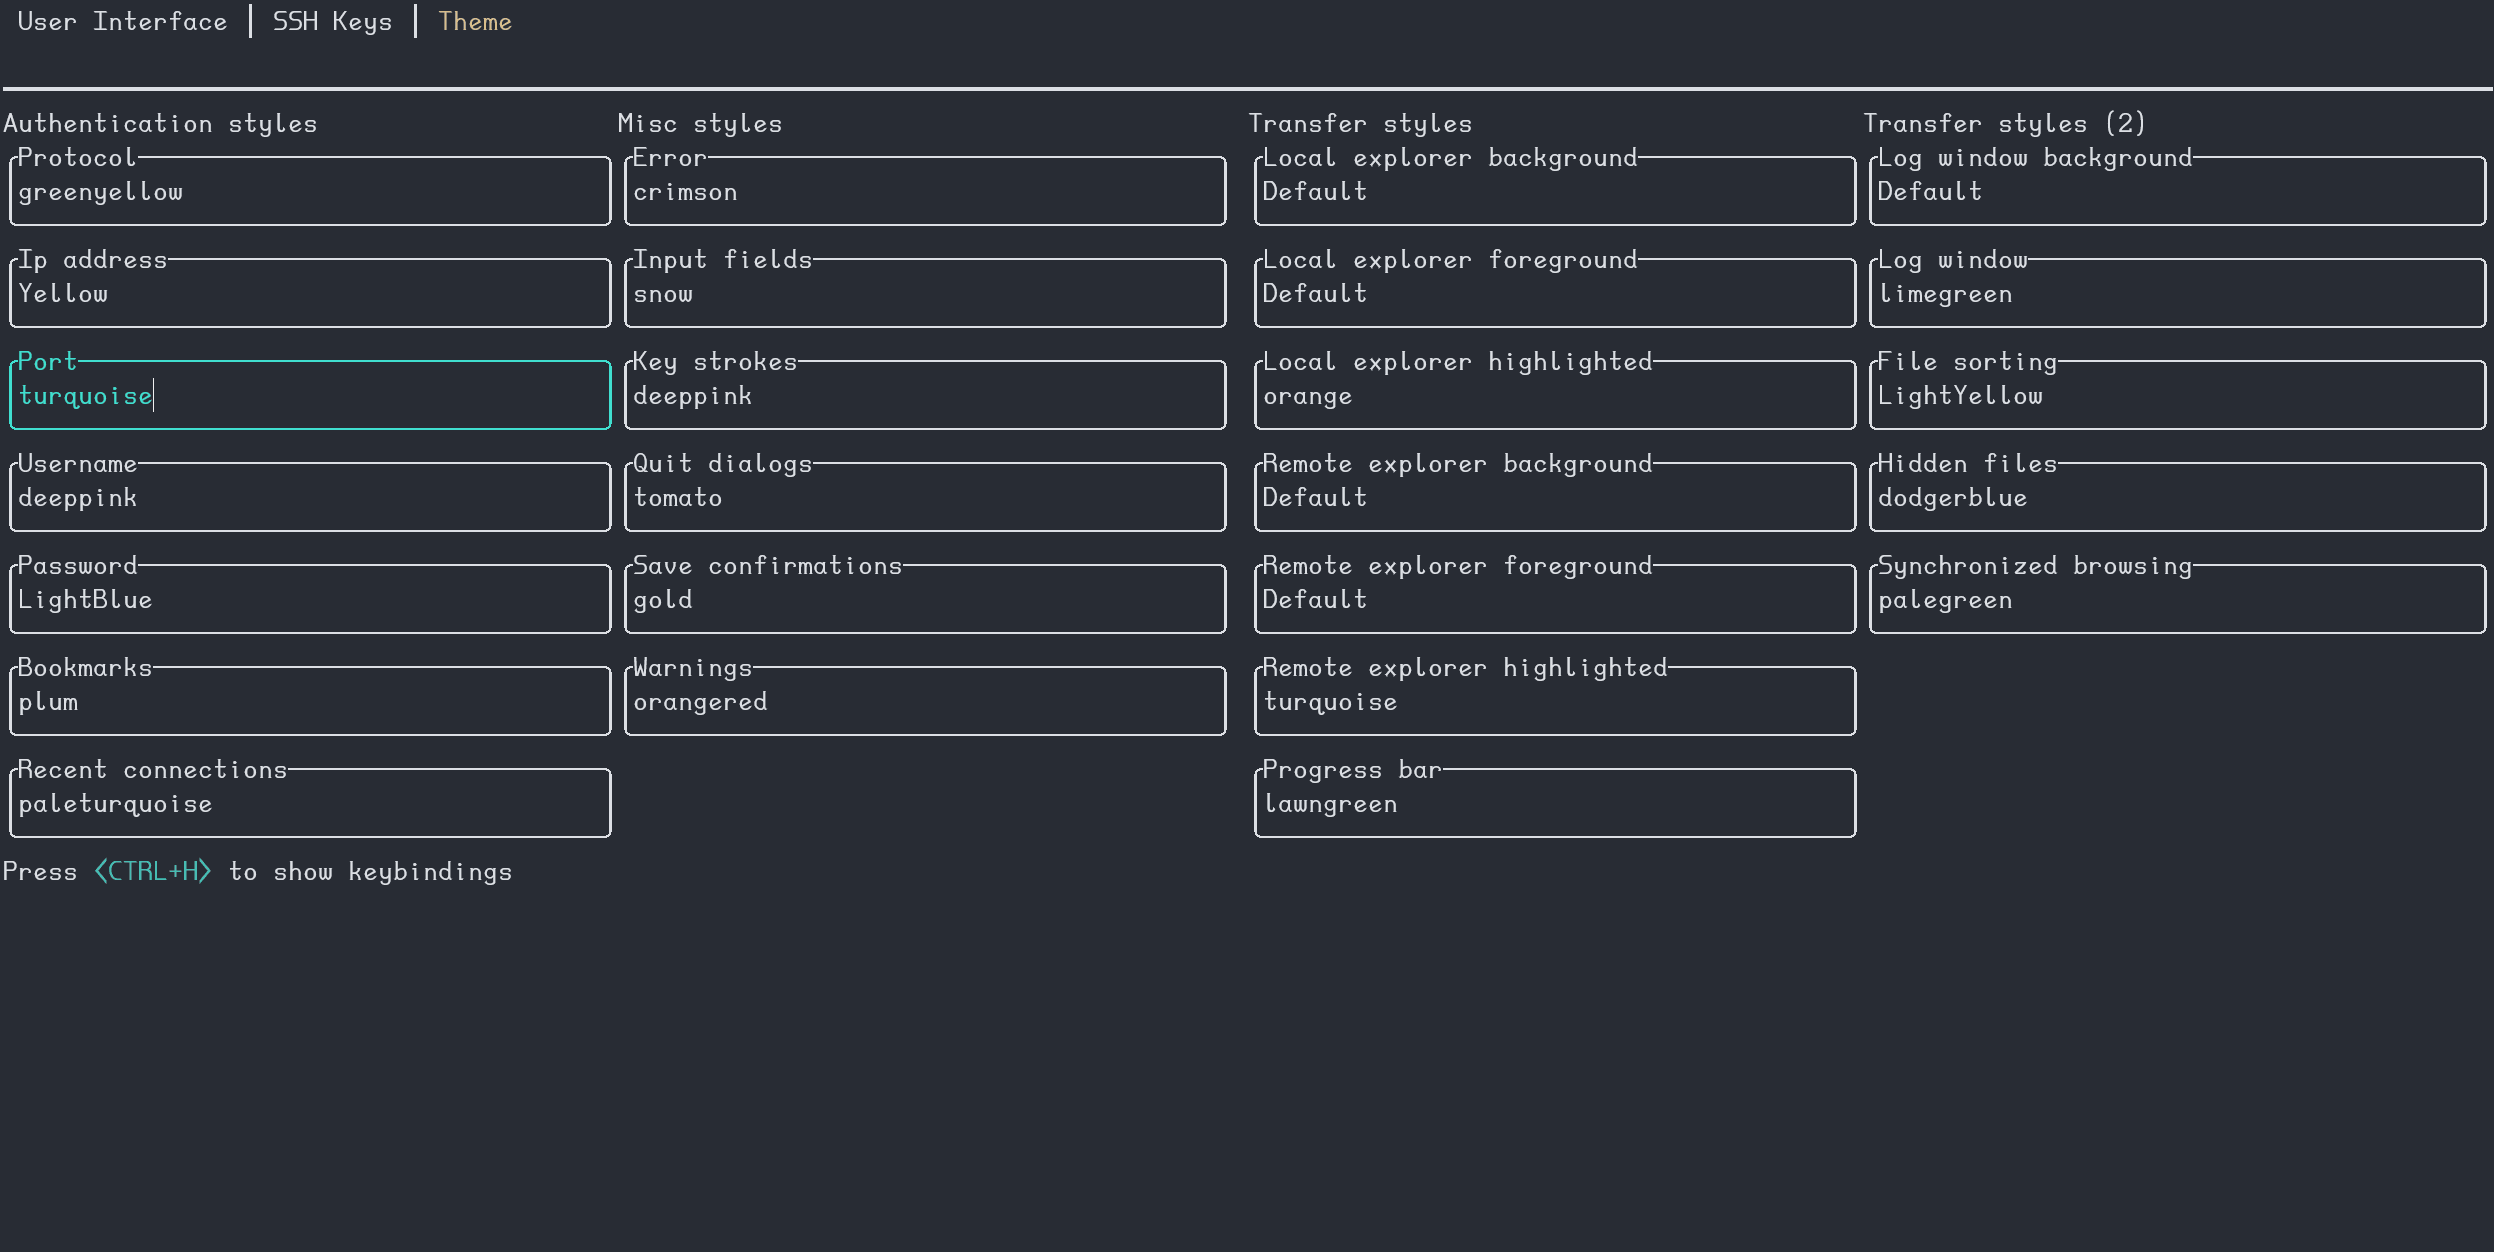
Themes
termscp lets you set the colors for several components in the application. There are two ways to customize termscp:
- From the configuration menu
- Importing a theme file
Customize from the configuration menu
To customize termscp from the configuration menu, enter the configuration from
the auth screen by pressing <CTRL+C>, then press <TAB> twice to reach the
themes panel. Move with <UP> and <DOWN> to select the style you want to
change, as shown in the gif below:
Import a theme file
You can also import theme files. You can take inspiration from, or directly use,
one of the themes bundled with termscp in the themes/ directory of the
repository. Import a theme by running:
termscp theme <theme_file>
If everything is fine, termscp confirms the theme has been imported.
Color syntax
termscp accepts the following color formats:
- Explicit hexadecimal:
#rrggbb - RGB:
rgb(r, g, b) - CSS color names (such as
crimson) - The special keyword
Default, which uses the situational default foreground or background color (foreground for texts and lines, background otherwise)
Recovering from a theme that won’t load
After an update, a saved theme can fail to load. This happens when a new key is added to themes: the previously saved theme no longer contains that key. There are two quick fixes:
-
Re-import the official theme. After each release the official themes are patched, so download the updated theme from the repository and re-import it:
termscp theme <theme.toml> -
Edit your theme by hand. If you use a custom theme, edit the file and add the missing key. The theme is located at
$CONFIG_DIR/theme.toml, where$CONFIG_DIRis:- FreeBSD/Linux:
$HOME/.config/termscp - macOS:
$HOME/.config/termscp - Windows:
%USERPROFILE%\.termscp
Missing keys are reported in the CHANGELOG under
BREAKING CHANGESfor the version you have just installed. - FreeBSD/Linux:
Styles
The tables below describe each style field. Note that styles do not apply to the configuration page, so it always remains usable in case you change something by mistake.
Authentication page
| Key | Description |
|---|---|
auth_address | Color of the input field for IP address |
auth_bookmarks | Color of the bookmarks panel |
auth_password | Color of the input field for password |
auth_port | Color of the input field for port number |
auth_protocol | Color of the radio group for protocol |
auth_recents | Color of the recents panel |
auth_username | Color of the input field for username |
Transfer page
| Key | Description |
|---|---|
transfer_local_explorer_background | Background color of localhost explorer |
transfer_local_explorer_foreground | Foreground color of localhost explorer |
transfer_local_explorer_highlighted | Border and highlighted color for localhost explorer |
transfer_remote_explorer_background | Background color of remote explorer |
transfer_remote_explorer_foreground | Foreground color of remote explorer |
transfer_remote_explorer_highlighted | Border and highlighted color for remote explorer |
transfer_log_background | Background color for log panel |
transfer_log_window | Window color for log panel |
transfer_progress_bar_partial | Partial progress bar color |
transfer_progress_bar_total | Total progress bar color |
transfer_status_hidden | Color for status bar “hidden” label |
transfer_status_sorting | Color for status bar “sorting” label; applies also to file sorting dialog |
transfer_status_sync_browsing | Color for status bar “sync browsing” label |
Misc
These styles apply to different parts of the application.
| Key | Description |
|---|---|
misc_error_dialog | Color for error messages |
misc_info_dialog | Color for info dialogs |
misc_input_dialog | Color for input dialogs (such as copy file) |
misc_keys | Color of text for key strokes |
misc_quit_dialog | Color for quit dialogs |
misc_save_dialog | Color for save dialogs |
misc_warn_dialog | Color for warn dialogs |
Notifications
termscp sends desktop notifications for the following events:
- Transfer completed: sent once a transfer has been successfully completed.
Displayed only if the total transfer size is at least the configured
Notifications: minimum transfer size. - Transfer failed: sent once a transfer has failed due to an error.
Displayed only if the total transfer size is at least the configured
Notifications: minimum transfer size. - Update available: sent whenever a new version of termscp is available.
- Update installed: sent whenever a new version of termscp has been installed.
- Update failed: sent whenever the installation of an update fails.
Disable notifications
To turn notifications off, enter setup and set Enable notifications? to No.
Change the minimum transfer size
To change the threshold that gates transfer notifications, enter setup and set
Notifications: minimum transfer size to the value that suits you.
Logging
termscp writes a log file for each session, located at:
$HOME/.cache/termscp/termscp.logon Linux/BSD$HOME/Library/Caches/termscp/termscp.logon macOSFOLDERID_LocalAppData\termscp\termscp.logon Windows
The log is not rotated: it is truncated on each launch of termscp. If you want to report an issue and attach the log file, save the log somewhere safe before launching termscp again.
By default the log reports at the INFO level, so it is not very verbose.
Reproducing an issue at TRACE level
To submit an issue, reproduce the problem with the log level set to TRACE by
launching termscp with the -D CLI option.
Disabling logging
To turn logging off, start termscp with the -q or --quiet option. You can
alias termscp to make it persistent.
Security
The log file does not contain any plaintext password. It exposes the same
information as the sibling bookmarks file.
Password security
Bookmarks are saved in your configuration directory along with their passwords. Passwords are not stored in plaintext: they are encrypted with AES.
The key used to encrypt passwords is stored, where possible, in the operating system secret store:
- The Windows Vault on Windows
- The system keyring on Linux
- The Keychain on macOS
This is managed directly by your operating system.
On BSD and WSL there is no such secret store, so the encryption key is saved on
disk at $HOME/.config/termscp. The location protects the key with file
permissions so that it cannot be read by other users, but you should still avoid
saving passwords for servers exposed on the internet on these systems.
Linux keyring
On Linux there might be no keyring installed on your system. The key storage
requires a service that exposes org.freedesktop.secrets on D-Bus, and only a
few services provide it:
- If you use GNOME as your desktop environment (e.g. Ubuntu users), the keyring
is already provided by
gnome-keyringand everything should work out of the box. - For other desktop environments, you can use KeepassXC to obtain a keyring. It must be set up to work with termscp; see KeepassXC setup below.
- If you do not want to install any of these services, termscp keeps working as usual and falls back to saving the key in a file, as it does for BSD and WSL.
KeepassXC setup
Follow these steps to set up KeepassXC for termscp:
- Install KeepassXC.
- Go to “Tools” > “Settings” in the toolbar.
- Select “Secret service integration” and enable “Enable KeepassXC freedesktop.org secret service integration”.
- Create a database, if you do not have one yet: from the toolbar, “Database” > “New database”.
- From the toolbar, go to “Database” > “Database settings”.
- Select “Secret service integration” and enable “Expose entries under this group”.
- Select the group where the termscp secret will be kept. Note that any other application can read secrets exposed via D-Bus for that group.
Command-line usage
termscp can be started with the following invocation forms:
termscp [options]... [protocol://user@address:port:wrkdir] [protocol://user@address:port:wrkdir] [local-wrkdir]
OR
termscp [options]... -b [bookmark-name] -b [bookmark-name] [local-wrkdir]
AND any combination of the two.
If no extra arguments are provided, termscp shows the authentication form. If an address argument or a bookmark name is provided, termscp skips the form and connects directly to the remote server. When an address or bookmark is given, you may also provide the starting working directory for the local host as the last positional argument.
Options
| Key | Description |
|---|---|
-b <bookmark-name> | Resolve the positional address argument as a bookmark name. Repeat the flag to open multiple bookmarks. |
-D | Enable the TRACE log level (debug/verbose logging). |
-P <password> | Provide the password from the CLI. Repeat the flag for multiple remotes; the order must match the address arguments. Discouraged. |
-q | Disable logging. |
-T <ticks> | Set the UI tick interval in milliseconds. Default is 10. |
--wno-keyring | Disable system keyring support. |
-v | Print version info. |
--help | Print the help page. |
The -P option is discouraged because the password may be kept in the shell
history. See the bookmarks and password-security chapters for safer ways to
provide credentials.
Subcommands
termscp exposes the following subcommands.
Import a theme
termscp theme <theme-file>
Import the theme defined in <theme-file>.
Install the latest version
termscp update
Download and install the latest available version of termscp.
Import ssh hosts
termscp import-ssh-hosts [ssh-config-file]
Import all the hosts from the specified ssh config file as bookmarks in
termscp. If [ssh-config-file] is not provided, the default location
~/.ssh/config is used. Identity files are imported as ssh keys in termscp too.
Open configuration
termscp config
Start termscp directly in the configuration (setup) screen.
Developer manual
Welcome to the developer manual for termscp. This chapter does NOT contain the documentation for termscp modules, which can instead be found on Rust Docs at https://docs.rs/termscp. This chapter describes how termscp works and the guidelines to implement features such as file transfers and additions to the user interface.
termscp is written in Rust (edition 2024, MSRV 1.89.0). The user interface is built with tuirealm v3, which runs on top of crossterm.
How termscp works
termscp is basically made up of 3 core modules:
- The host: the host module provides functions to interact with file
systems. It exposes the
HostBridgetrait, which abstracts file operations over both the local host (Localhost) and the remote host (RemoteBridged). - The ui: this module contains the implementation of the user interface. As shown in the next chapter, this is achieved through activities.
- The activity_manager: the activity manager takes care of managing activities. It runs the activities of the user interface and chooses, based on their state, when to terminate the current activity and which activity to run next.
In addition to the 3 core modules, others have been added over time:
- config: provides the configuration schema and its serialization methods.
- explorer: exposes the explorer structures, which are used to handle the file explorer in the ui. They store the current directory model and the view states (e.g. sorting, whether to display hidden files, the transfer queue).
- filetransfer: defines the
FileTransferProtocolenum and theRemoteFsBuilder, which constructs the appropriateRemoteFsclient from the connection parameters. - system: provides a way to interact with the configuration, the ssh key storage and the bookmarks.
- utils: contains the utilities used by pretty much all of the project.
termscp supports the following protocols: SFTP, SCP, FTP/FTPS, Kube, S3, SMB and WebDAV.
Activities
This paragraph gives a short overview of activities. Read the code and the documentation for a clear idea of how the ui works.
There are many ways to implement a user interface. This project borrows what works best from different frameworks:
- Activities on top: each “view” is an Activity, and an
Activity Managerhandles them. This approach is inspired by Android. It fits a ui that has different views, each one with its own components and logic. Activities work with theContext, which is a data holder used to share data between activities. - Activities display Applications: each activity can show different Applications. An application contains a View, which is basically a list of components, each one with its properties. The view is a facade to the components and also handles the focus, which is the current active component. You cannot have more than one active component, so this must be handled; at the same time, focus must be given back to the previously active component if the current one is destroyed. The Application takes care of all this. To learn more, read https://github.com/veeso/tui-realm.
- Components: components are built around tui in order to reuse widgets. This
is achieved through the
Componenttrait, inspired by React. Each component has its Properties and can have its States. Each component must handle input events, accept new properties, and provide a method to render itself. This logic now lives in tui-realm. - Messages: an Elm-based approach: input events are handled with an approach
inspired by Elm. In Elm you implement your ui using
three basic functions: update, view and init. termscp implements
the equivalent of the Elm update function as a large match case inside a
recursive function, which you can find in the
update.rsfile inside each activity. This match case handles the messages produced by the components in response to incoming input events and causes the activity to change its state.
termscp implements a trait called Activity, a much reduced version of the
Android activity. This trait provides these methods:
on_create: initializes the activity. The context is passed to the activity, which becomes the only owner of the Context until the activity terminates.on_draw: called each time the user interface should be updated. This is basically the run method of the activity, and it also handles input events. The interface should not be drawn on every call (this method may be called hundreds of times per second), but only when something has actually changed (for example after an input event).will_umount: returns whether the activity should be destroyed. If so, it returns anExitReason, which indicates why the activity should terminate. Based on the reason, the activity manager chooses whether to stop the execution of termscp or to start a new activity, and which one.on_destroy: finalizes the activity and drops it. This method returns the Context to the caller (the activity manager).
The Context
The context is a structure that holds data shared between activities. Every time an Activity starts, the Context is taken by the activity, until it is destroyed, where the context is finally returned to the activity manager. The context holds the following data:
- The Localhost: the local host structure.
- The File Transfer Params: the current parameters used to connect to the remote.
- The Config Client: a structure that provides functions to access the user configuration.
- The Store: a key-value storage that can hold any kind of data. It can be used to share state between activities or to keep persistence for heavy or slow tasks (such as checking for updates).
- The Terminal: used to render the tui on the terminal.
Achieving an abstract file transfer client
When the implementation of termscp started, in December 2020, file transfer was
at the core of the design, since it is at the heart of termscp. The first
implementation consisted of a filetransfer module that exposed a trait called
FileTransfer, which provided methods to generically interact with the remote
file system.
This changed over time, as different users asked for a dedicated library. In the
last quarter of 2021, remotefs was born:
an abstract library to work with remote device file systems. remotefs provides a
RemoteFs trait that exposes all of the core file-system functionalities, and
since version 0.8.0 it has replaced the FileTransfer trait.
The file transfer module still exists, but its only task is to build a
RemoteFs client implementation from the file transfer parameters through the
RemoteFsBuilder.